This post contains affiliate links. Read my disclosure policy here.
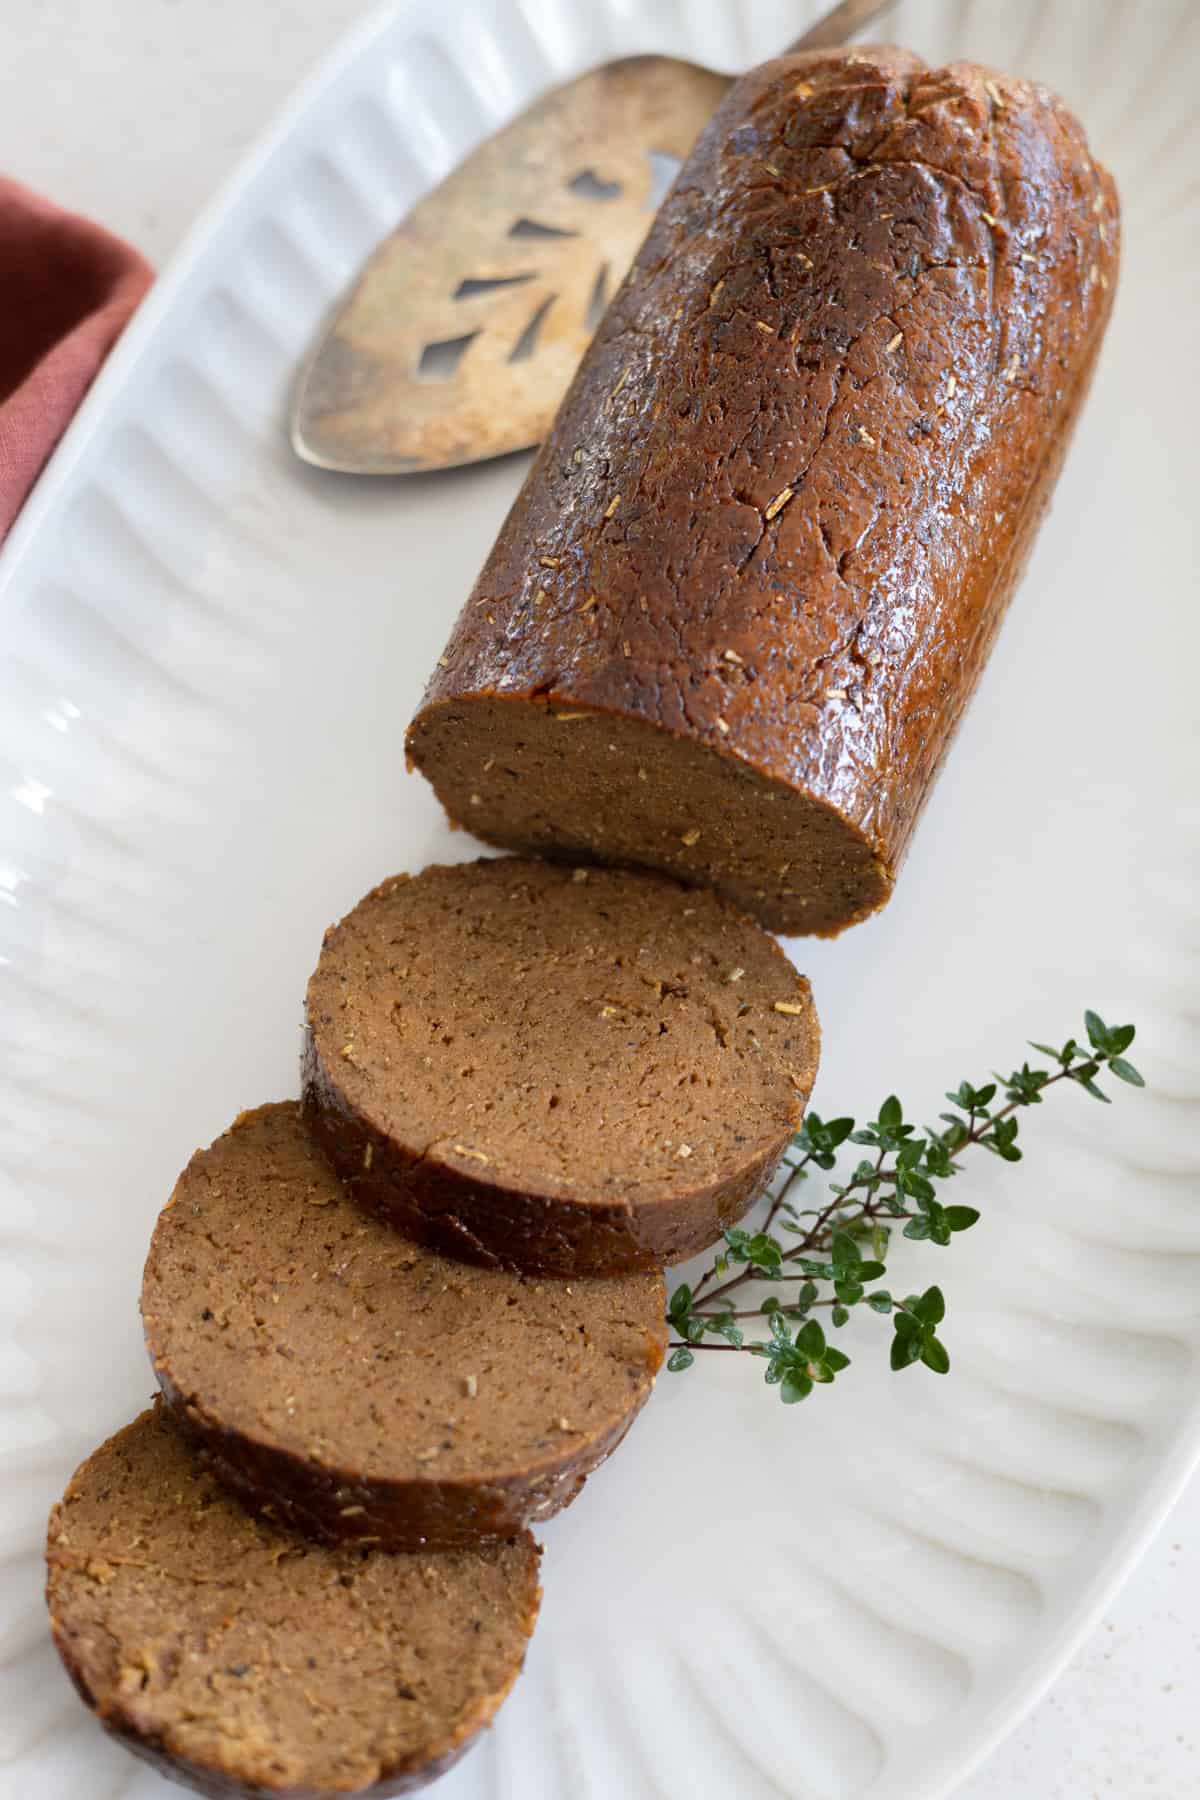
Make your festive dinner complete with this succulent Vegan Holiday Roast. It's filled with savory flavors and finished with a mouth-watering glaze.

Let the celebrations begin!! I'm SO ready for some spiked nog and a nice sit-down dinner with family and friends. It's always a blast!
I usually make this Vegan Holiday Roast along with my Vegan Wellington for the main entrées and serve them with all the holiday classics. It's an absolute feast!
This vegan roast recipe may look intimidating but it's actually quite easy to make, so don't be scared off. The hardest part is waiting for it to come out of the oven. I promise it'll be worth it though! Check it out...
Ingredients Needed
Here are the ingredients you'll need and some additional notes:
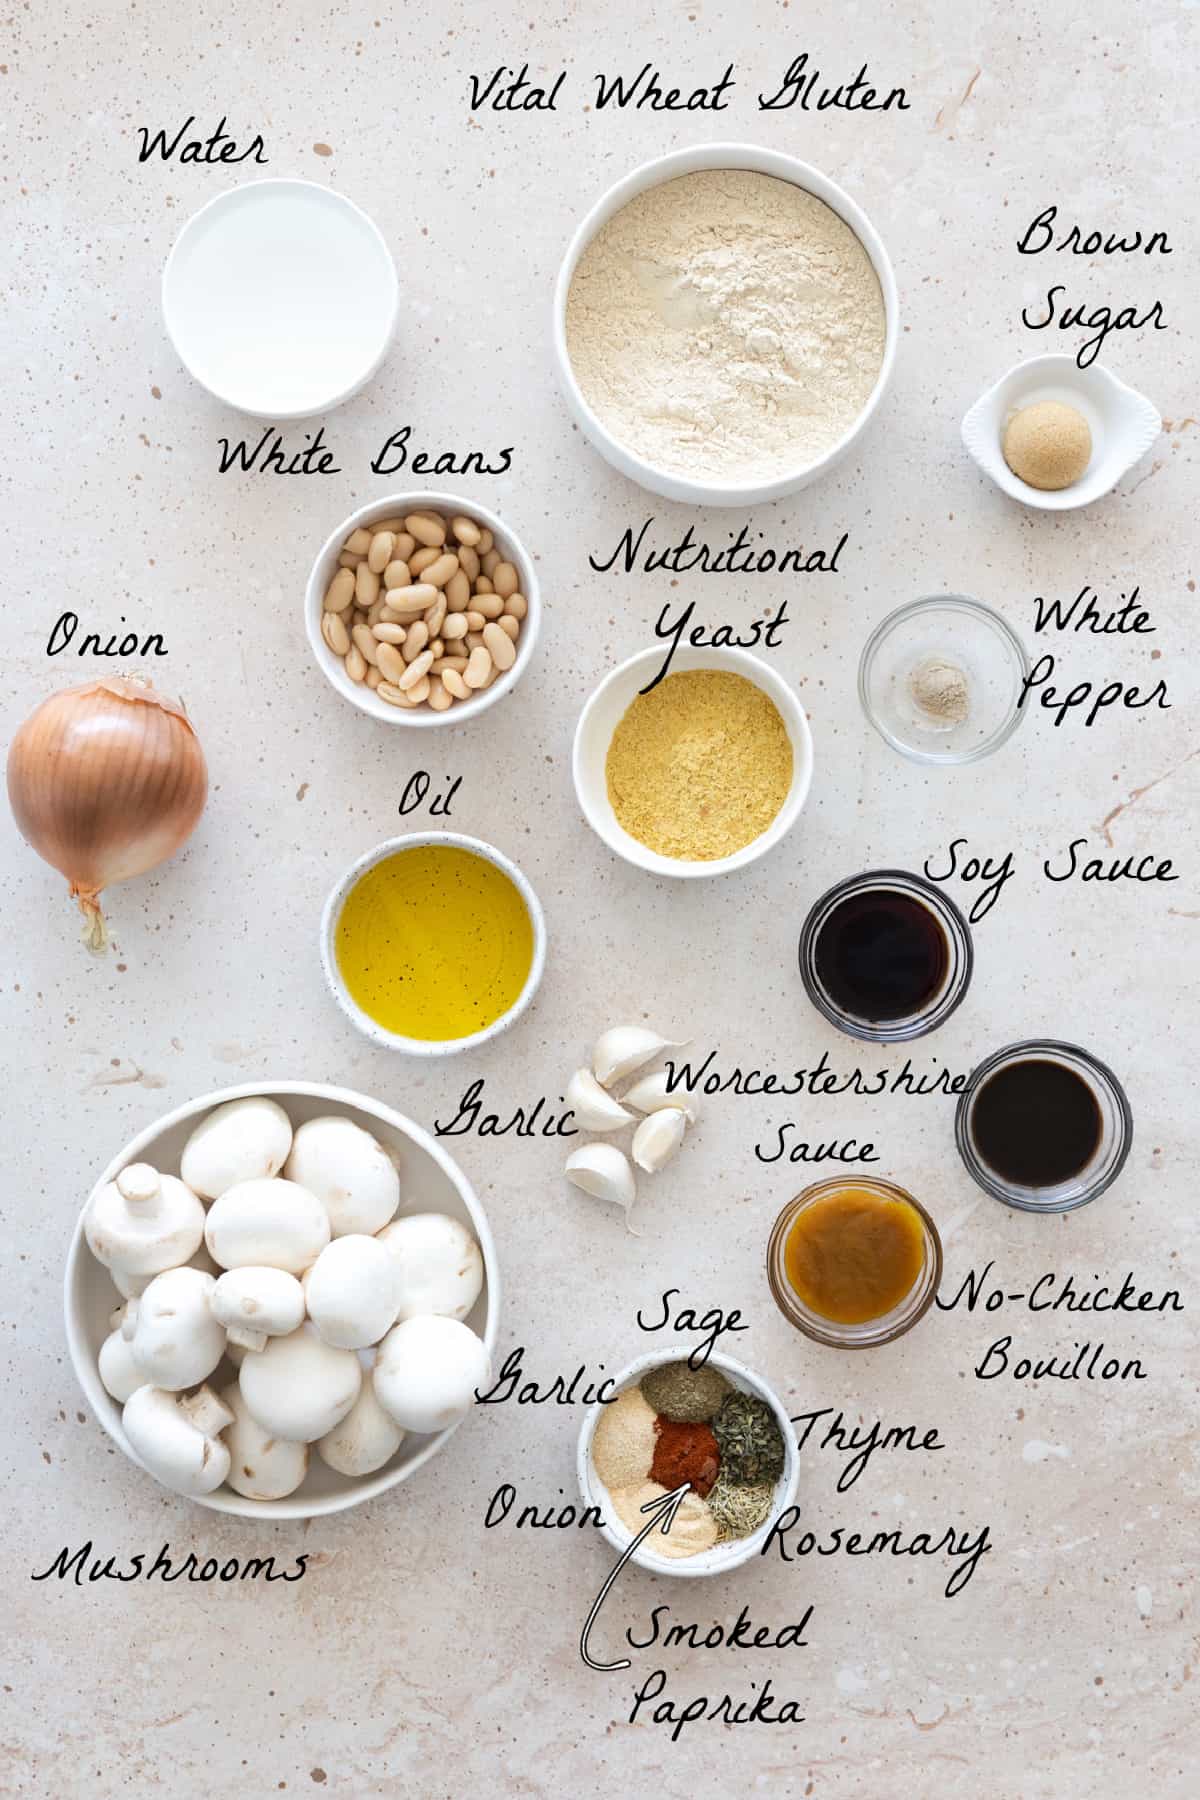
- Olive oil - you can also use avocado, sunflower, grapeseed, etc.
- Onion - I used a yellow onion, but you can use white if that's what you have. Shallots will work nicely, too.
- White mushrooms - you can use any type of mushrooms, just note that the brown mushrooms will create a slightly darker roast.
- Garlic - lots of fresh garlic will provide wonderful flavor.
- Soy sauce - it adds umami flavor. You can also use tamari or coconut aminos.
- Cannellini beans - any white beans will work such as great northern or navy beans.
- Nutritional yeast - adds lots of umami flavor.
- Better Than Bouillon - no chicken base - yields tons of savory flavor and I highly recommend it, but if you can't find the 'no chicken base', you can use their regular vegetable broth. This will darken the loaf slightly and will taste a little different, but it will still be delicious.
- Vegan Worcestershire sauce - If you can't find it, you can use barbeque sauce or vegan steak sauce. You can also use a combination of 2 teaspoons of ketchup, 1.5 teaspoons of balsamic vinegar, and 1 teaspoon of low-sodium soy sauce.
- Seasoning - granulated garlic, granulated onion, rosemary, thyme, ground sage, smoked paprika, ground white pepper. Feel free to switch it up here, but don't omit too much or it won't be as flavorful.
- Vital wheat gluten - this is essential for the recipe and cannot be substituted with anything else.
- Water
How to make a Vegan Holiday Roast
Here are step-by-step photos to show you the entire process. It's easy!
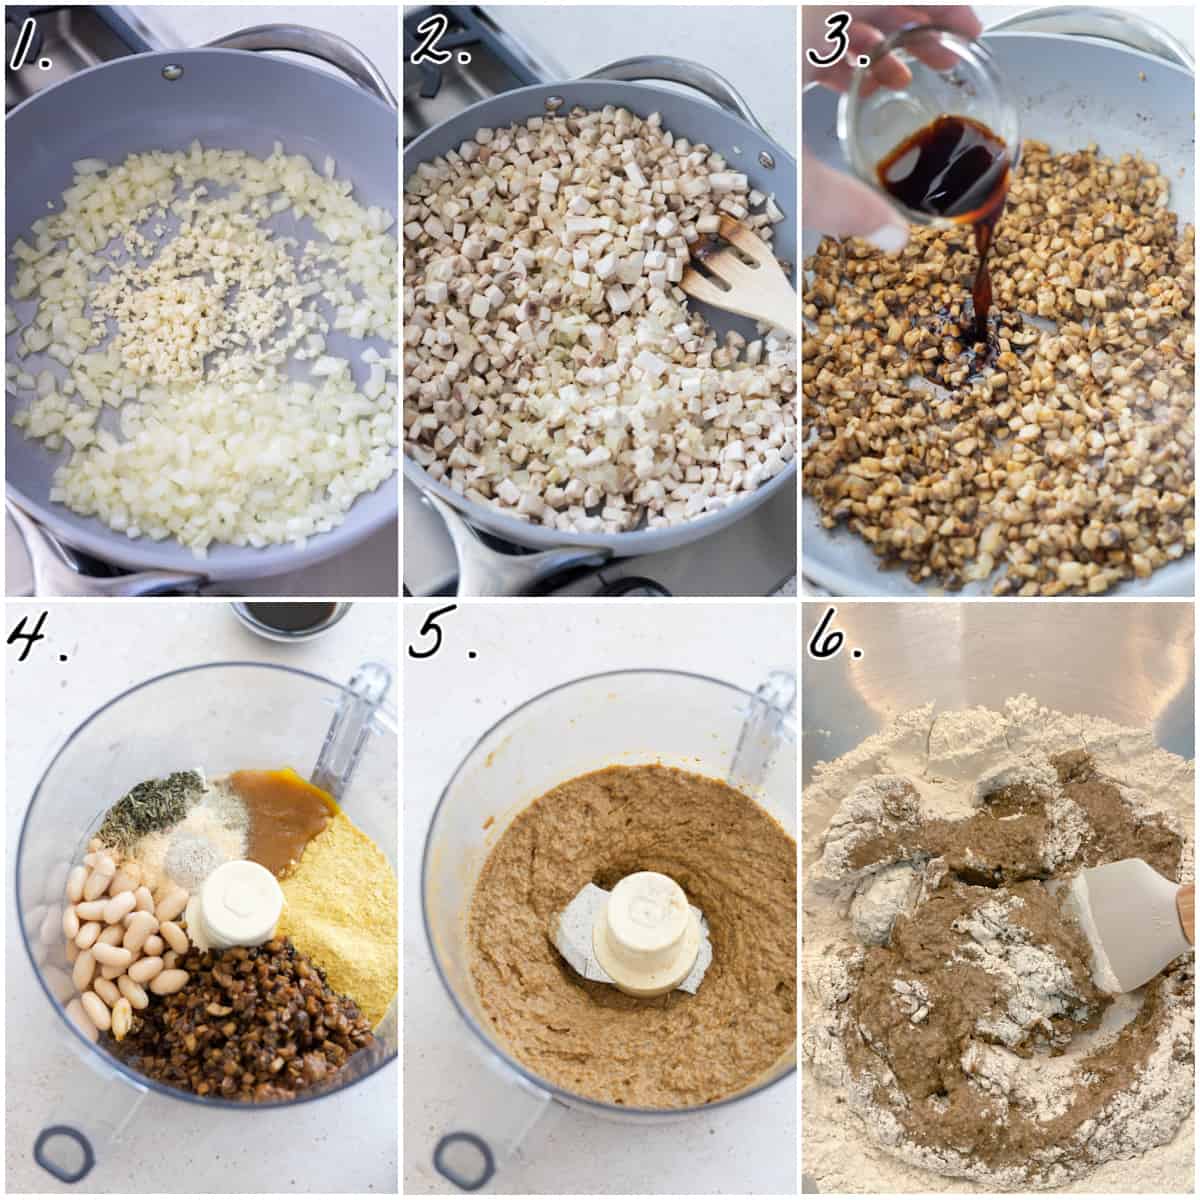
- Sauté the onion in oil over medium heat until translucent then add garlic and sauté until fragrant.
- Add the mushrooms and cook until they have released their water, have reduced in size, and are lightly golden. Pour in the soy sauce and stir into the mushrooms. Remove from heat and let cool for a few minutes.
- To a food processor, add 2 cups of mushroom/onion mixture, and all the remaining ingredients (except the vital wheat gluten). Process for 2-3 minutes, scraping down sides as needed until everything is broken down and combined.
- To a large mixing bowl, add the vital wheat gluten and the mixture from the food processor. Stir until it just starts to come together (about 30-60 seconds).
- Using your hands keep combining, sweeping up all the vital wheat gluten in the bowl (about 30-60 seconds). Now knead for 5 minutes. The dough should be thick, slightly elastic, and somewhat fibrous looking.
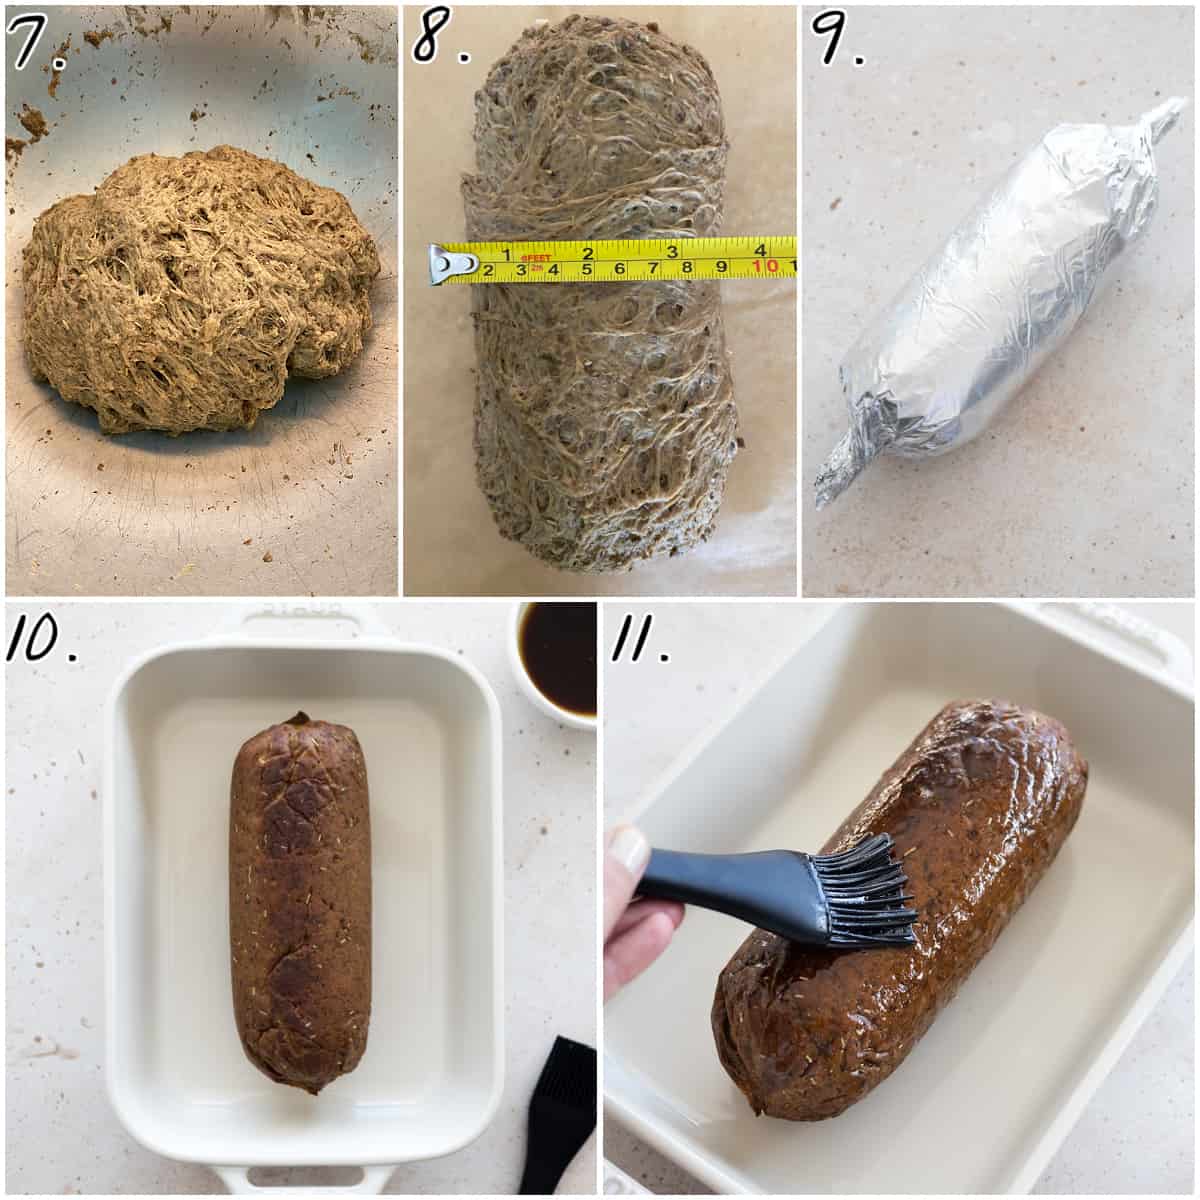
- Let the dough rest for 5 minutes then knead for 30-60 seconds and shape the dough into a loaf shape about 8 inches long and 3.5" inches wide.
- Roll the loaf in a piece of parchment paper, then roll in a piece of foil that's about 20" long, and twist the ends like a candy wrapper, securing in place. Bake for 80 minutes, flipping halfway through. Now remove from oven and allow the roast to sit undisturbed for 20 minutes. Remove from foil and parchment. You can slice and serve now OR prepare the loaf for glazing.
- Preheat your oven broiler to the low setting. In a small bowl, combine the brown sugar, oil, and soy sauce until the sugar has dissolved. Now, place the loaf back in the roasting pan and brush the top and sides with the glaze. Broil for 2-3 minutes until you see the glaze start to caramelize. Now brush one more layer on the top and sides and broil for another 2-3 minutes, watching carefully to prevent burning.
Success Tips
- It's best to dry-brush the mushrooms instead of rinsing them. They absorb a lot of water and this can make it difficult to brown them.
- It's very important to measure all of the ingredients accurately and follow the instructions precisely or this will alter the end results.
- For an accurate measurement, you can weigh the vital wheat gluten to get exactly 280 grams. If you don't have a kitchen scale, don't scoop the VWG with a measuring cup directly from the container. Instead, aerate it first, then scoop it out of your container with a spoon and then into a measuring cup. Don't pack or tap the cup. After filling, lightly sweep a butter knife across the top to remove the excess.
- Kneading is very important and should be done for 5 minutes. Any less and the loaf can turn out spongy. Also, if you over knead, the loaf can turn out tough and rubbery. If you feel you may have over kneaded, you can let the dough rest for 15 minutes before shaping it into a loaf.
- The loaf should be wrapped snugly but not super tight or it won't expand.
What should I serve with a Vegan Holiday Roast?
You can serve just about anything with this delicious seitan roast, but here are some of my faves:
- Mashed Potatoes & Mushroom Gravy
- Sautéed Green Beans
- Apple Cranberry Sauce
- A Festive Salad
- Baked Vegan Mac and Cheese
- Roasted Brussels Sprouts
- Vegan Cornbread
The best way to reheat leftovers
Preheat your oven to 350 °F (177 °C). Place the portion you'll be eating in a covered baking dish. It will get too dry if you leave it uncovered. You can top it with some gravy for extra moisture. Cook until heated throughout.
I'd love to hear from you
If you make this recipe, let me know what you think by ★ star rating it and leaving a comment below. It would really make my day. You can also follow me on Instagram and share your creation with me. Just tag me @veganhuggs and hashtag #veganhuggs so I don't miss it.
Recipe

Vegan Holiday Roast
Ingredients
- 3 tablespoons olive oil , divided
- 1 medium onion , diced (about 1 cup)
- 16 ounces (454g) white mushrooms , chopped (see note #1)
- 5 cloves garlic , chopped
- 1 ½ tablespoons soy sauce , low sodium
- ½ cup (120ml) water
- ½ cup (90g) cannellini beans , rinsed and drained (or any white beans)
- ¼ cup (25g) nutritional yeast
- 2 tablespoons Better Than Bouillon - no chicken base (see note #2)
- 1 ½ tablespoons vegan Worcestershire sauce (see note #3)
- 1 ½ teaspoons granulated garlic
- 1 ½ teaspoons granulated onion
- 1 ½ teaspoons dried rosemary
- 1 ½ teaspoons dried thyme
- 1 teaspoon ground sage
- 1 teaspoon smoked paprika (optional)
- ¼ teaspoon ground white pepper (sub black pepper)
- 2 ¼ cups (280g) vital wheat gluten (see note #4 & #5)
Glaze (optional)
- 1 tablespoon soy sauce , low sodium
- 1 tablespoon avocado oil or any oil
- 1 tablespoon light brown sugar (sub maple or agave)
- 1 tablespoon ketchup
Recommended Equipment
- Large Baking Dish
- Large Mixing Bowl
- Parchment Paper
- Aluminum Foil
Instructions
- Preheat oven to 400 °F (200 °C).
- Heat 2 tablespoons of oil in a large pan over medium-high heat. Add the onion and sauté until translucent, about 2-3 minutes.
- Add garlic and sauté until fragrant about 30-60 seconds.
- Now add the mushrooms and cook for 8-10 minutes, until they have released their water, have reduced in size, are lightly golden, and the pan is dry. Stir only occasionally so they have time to brown.
- Pour in the soy sauce and stir into the mushrooms. Cook for 30-60 seconds, scraping up any bits on the bottom of the pan. Remove from heat and let cool for a few minutes. Measure out 2 exact cups (368g) of mixture (you may have some left over-just save for another recipe or add to toast).
- To a food processor, add the 2 cups of mushroom/onion mixture, the remaining 1 tablespoon of oil, water, beans, nutritional yeast, bouillon, Worcestershire sauce, granulated garlic, granulated onion, rosemary, thyme, sage, smoked paprika, and pepper. Process for 2-3 minutes, scraping down sides as needed until everything is broken down and combined. It won't be completely smooth.
- To a large mixing bowl, add the vital wheat gluten and the mixture from the food processor, scraping everything out with a spatula. Stir until it just starts to come together (about 30-60 seconds). Now, using your hands, continue to combine while sweeping up all the vital wheat gluten in the bowl (30-60 seconds). Now, knead the dough for 5 minutes (no less). The dough should be thick, slightly elastic, and somewhat fibrous looking. (* if your bowl is large enough, you can knead the dough in there, otherwise, knead on a clean flat surface.)
- Let the dough rest for 5 minutes then knead for 30-60 seconds and shape the dough into a loaf shape about 8 inches long and 3.5" inches wide. Roll the loaf in a piece of parchment paper, then roll in a piece of foil that's about 20" long, and twist the ends like a candy wrapper, securing in place.
- Bake for 80 minutes, flipping halfway through. Now remove from oven and allow the roast to sit undisturbed for 20 minutes (no less). Remove from foil and parchment. You can slice and serve now OR prepare the loaf for glazing (next step).
- Preheat your oven broiler to the low setting. In a small bowl, combine the brown sugar, oil, ketchup, and soy sauce until the sugar has dissolved. Now, place the loaf back in the roasting pan and brush the top and sides with the glaze. Broil for 2-3 minutes, until the glaze starts to caramelize. Now brush one more layer on the top and sides and broil for another 2-3 minutes, watching carefully to prevent burning. (*If your broiler doesn't have a low setting, use the high setting and reduce the time. Watch very carefully.) Remove from oven and let rest 5-10 minutes before slicing.
Notes
- It's best to dry-brush the mushrooms instead of rinsing them. They absorb a lot of water and this can make it difficult to brown them.
- If you can't find Better Than Bouillon - no chicken base, you can use their no-beef broth. This will darken the loaf slightly, and the flavor will vary, but it will be delicious. You can also use their regular broth if that's all you can find.
- If you can't find vegan Worcestershire sauce, you can use barbecue sauce or vegan steak sauce. You can also use a combination of 2 teaspoons of ketchup, 1.5 teaspoons of balsamic vinegar, and 1 teaspoon of low-sodium soy sauce.
- Vital Wheat Gluten - this is essential for the recipe and cannot be substituted with anything else.
- Measuring Vital Wheat Gluten - For an accurate measurement, you can weigh the VWG to get exactly 280 grams. If you don't have a kitchen scale, don't scoop the VWG with a measuring cup. Instead, scoop it out of your container with a spoon and then into the measuring cup. Don't pack or tap the cup. After filling, lightly sweep a butter knife across the top to remove the excess.
- It's very important to measure all of the ingredients accurately and follow the instructions precisely, or this will alter the results.
- Kneading is very important and should be done for 5 minutes. Any less and the loaf can turn out spongy. Also, if you over knead, the loaf can turn out tough and rubbery. If you feel you may have over kneaded, you can let the dough rest for 15 minutes before shaping it into a loaf
- The loaf should be wrapped snugly but not super tight, or it won't expand.
- Glaze: This adds nice color with a slight sheen and crisps the surface slightly for a better table presentation, but it's completely optional. If you want a thick, sticky glaze, you can use a thick teriyaki sauce or barbecue sauce, or a blend of both.
- For a firmer texture, let the roast cool completely, then wrap it and chill it in the fridge for 6-12 hours. You can slice it cold and heat individual slices, or reheat the entire loaf. Either way, loosely cover while reheating to avoid drying it out.
- Serving Ideas: serve with Vegan Gravy, Sautéed Green Beans, and Cranberry Sauce, or with all the traditional holiday sides.


Heather
Love this recipe! Next time I would cut down on the Better than Bouillon because it is more salty than I prefer. Other than that it was easy and so flavorful. It is perfect for lunch "meat" in sandwiches as well. Great recipe!
Melissa Huggins
Hi Heather, I'm glad you loved it and so glad you'll try it again to suit your taste. Thank you for making it and sharing feedback. 🙂
Michelle
I gave the roast a trial run before Thanksgiving. The roast was delicious! My son who carefully critiques my cooking said, "Mom, you hit it out of the ballpark!" After we had dinner, I found him slicing another piece for a sandwich. The next morning he grilled some onions, added a slice on top and covered it with a lid to warm it up. He then added it to some toast with fixings (spinach and tomato). He's a big fan and so am I. This recipe will be our go-to for future family celebrations! Thank you Vegan Huggs!
Melissa Huggins
Hi Michelle, this made my day! I'm so happy it was a hit and your son found other ways to use it. Thank you for trying it and sharing wonderful feedback. 🙂
Aziza
I’m in the process of making this and I’m pretty sure your Metric measurements are off…might want to have a look at this 🤔
Melissa Huggins
Hi Aziza, thank you for bringing that to my attention. Not sure what happened there. It's all fixed now. 🙂