This post contains affiliate links. Read my disclosure policy here.
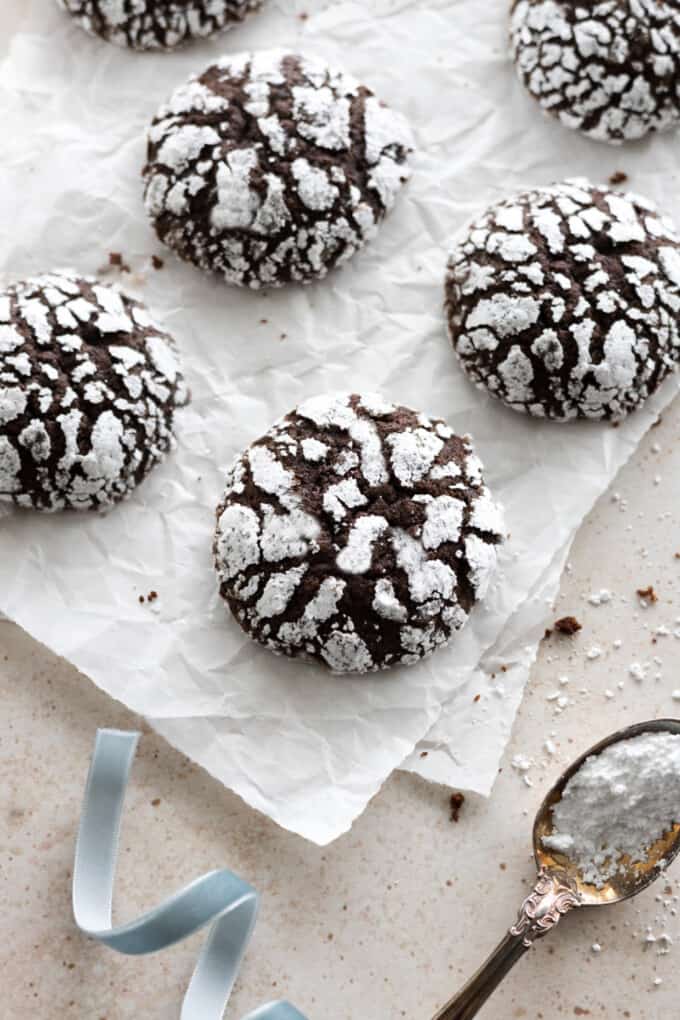
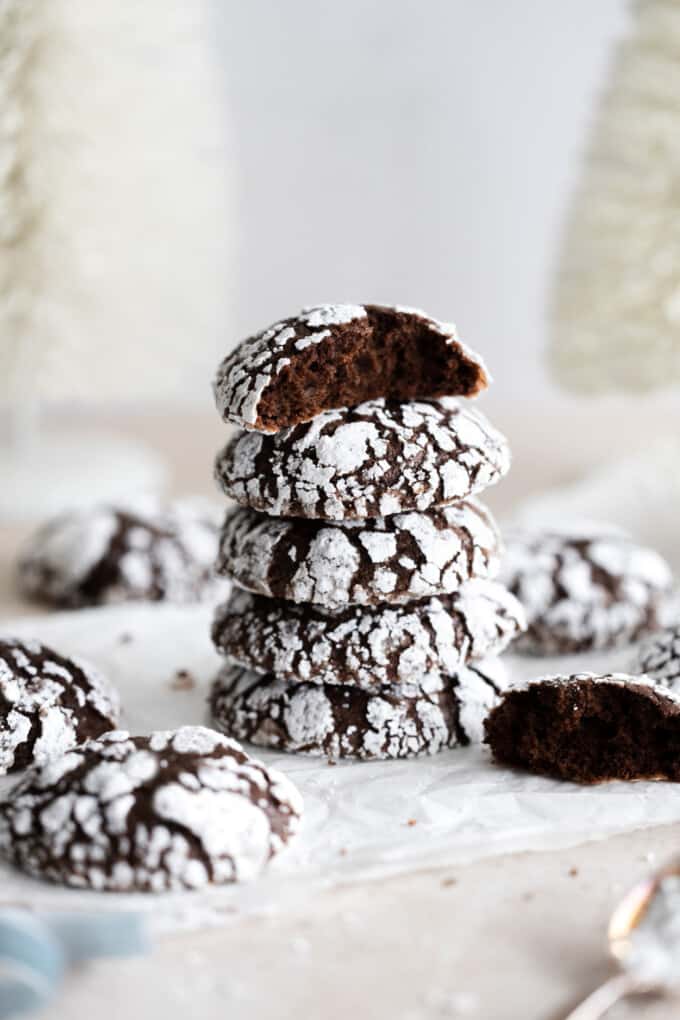
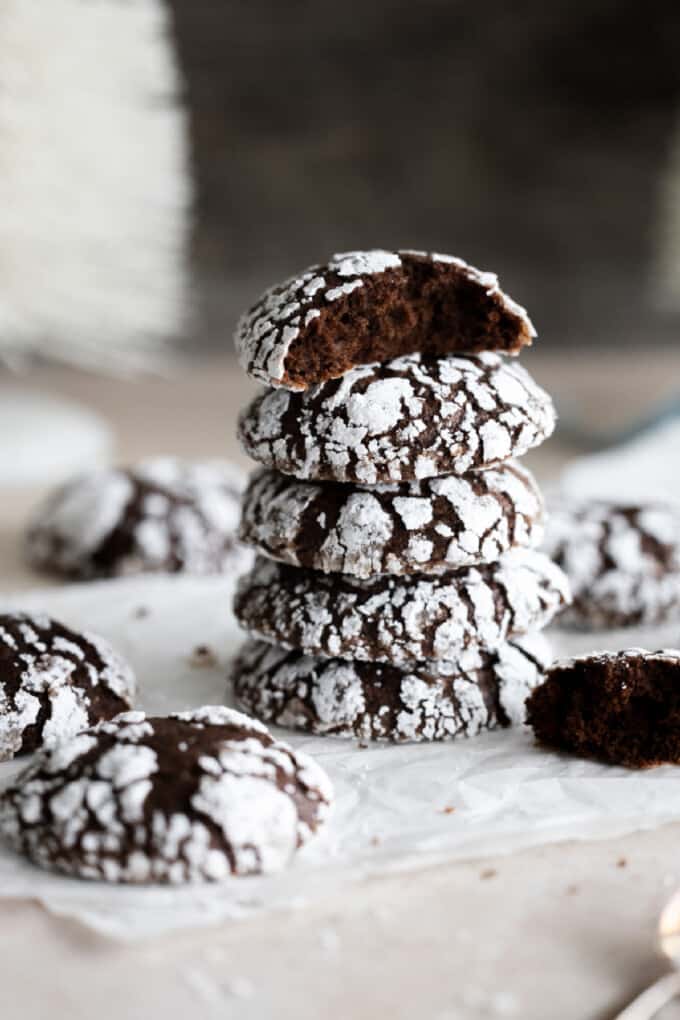
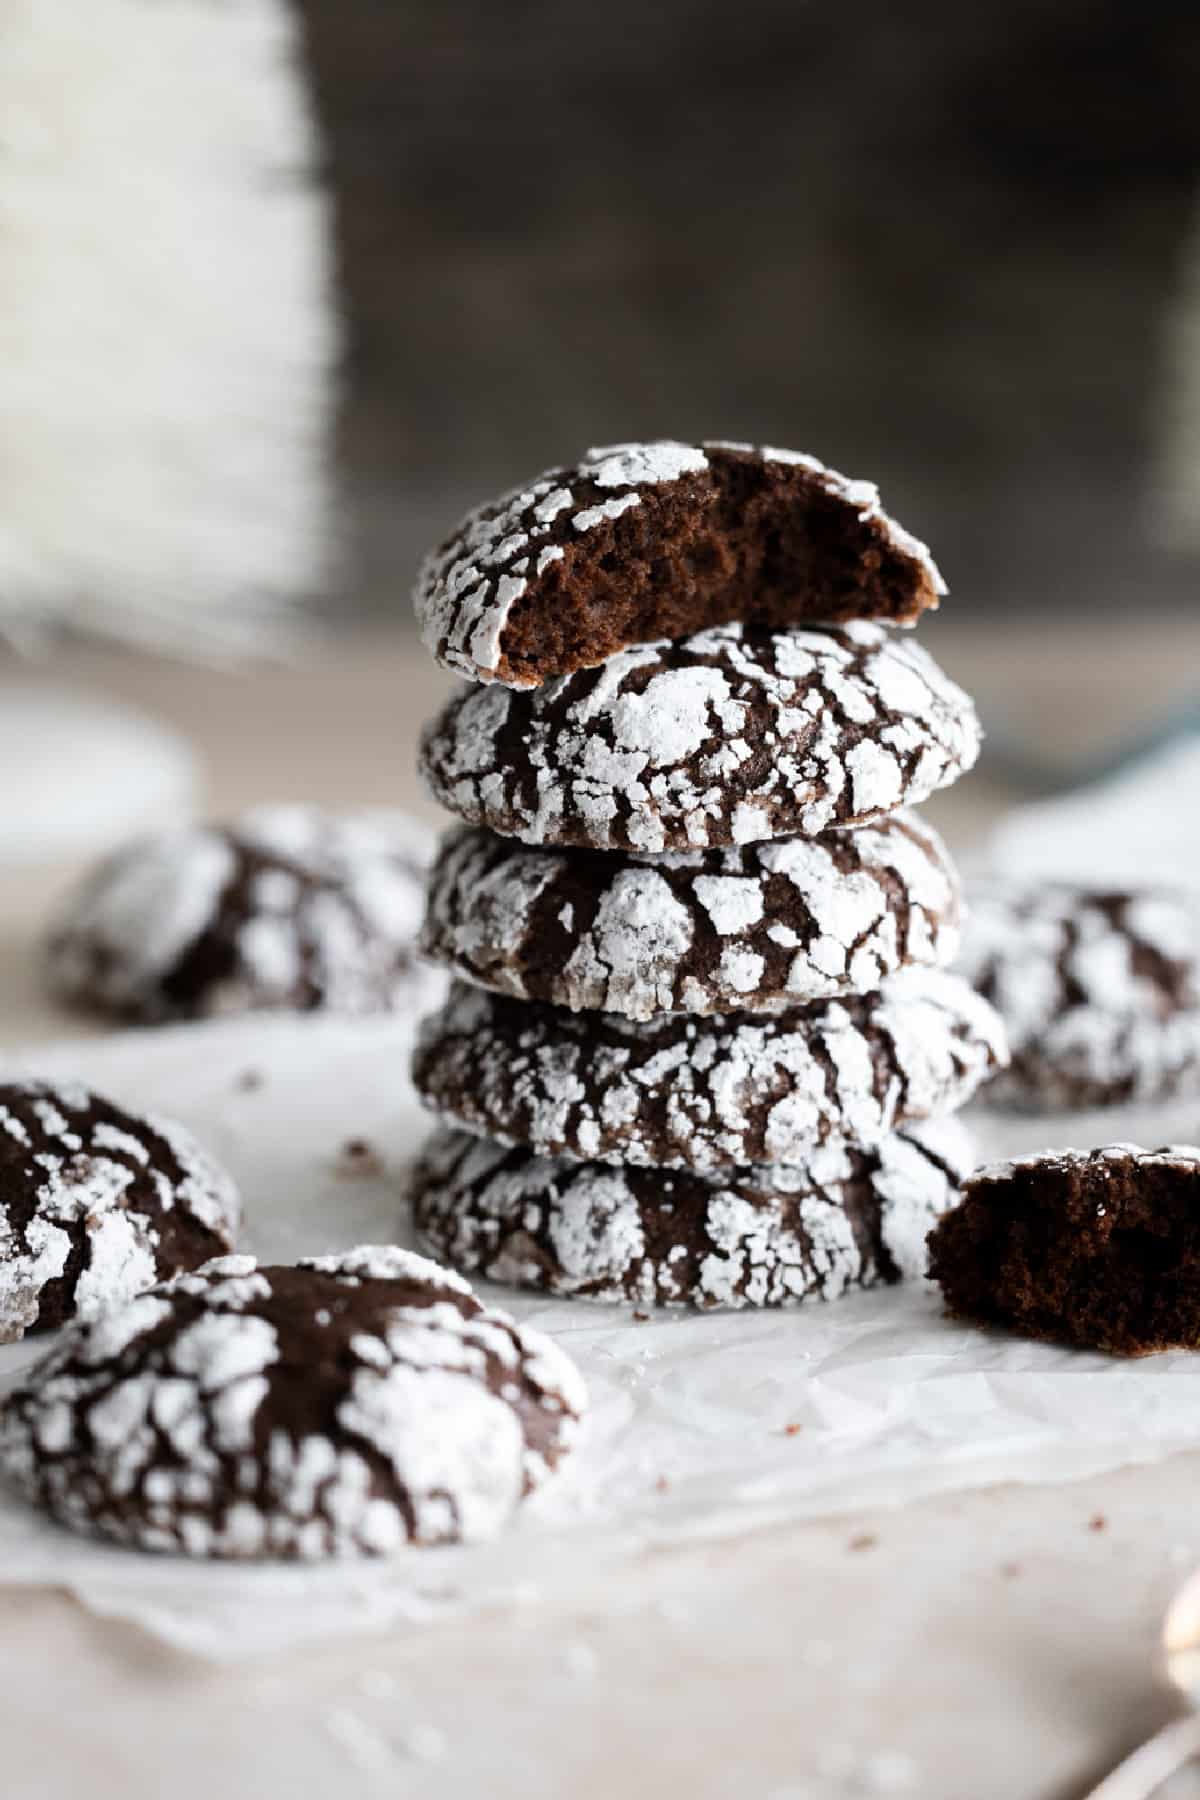
These Vegan Chocolate Crinkle Cookies will be a hit at your next holiday gathering. They are buttery, chocolatey, and coated in crackled sugary heaven!
Whether you are hosting a holiday party or heading out for the festivities, these Vegan Chocolate Crinkle Cookies are the perfect treats to make for your friends and family. They are easy and fun to make, and everyone will love them!
You can also make them and hand them out as gifts. Just wrap them in a little festive box or hand them out with a side of homemade hot chocolate on a stick. Because what goes better with chocolate than more chocolate? I prefer enjoying these cookies with a cold glass of vegan eggnog. So good!
Ingredients Needed
The ingredients list to make these crinkle cookies is short and simple. Find ingredients notes and swaps below.

- Flaxseed Meal - If you only have whole flaxseeds, you can grind them up in a coffee grinder. Make sure to measure the flaxseed in its ground form.
- Vegan Butter - I used Miyoko's vegan butter because I prefer the flavor, but any non-dairy butter will work. You can use unsalted butter if preferred, but I felt the taste was better with the salted variety.
- Vanilla Extract - You can also use peppermint extract or a blend of both. Just ½ teaspoon of peppermint will provide the right amount of flavor. Reduce the vanilla extract to 1 ½ teaspoons if using peppermint or omit.
- Cocoa Powder - You can also use Dutch process for a deeper chocolate flavor.
How to make Vegan Chocolate Crinkle Cookies
This part is straightforward! Just make the dough, chill it, then roll it into sugary goodness, and bake! Here's how to do it:
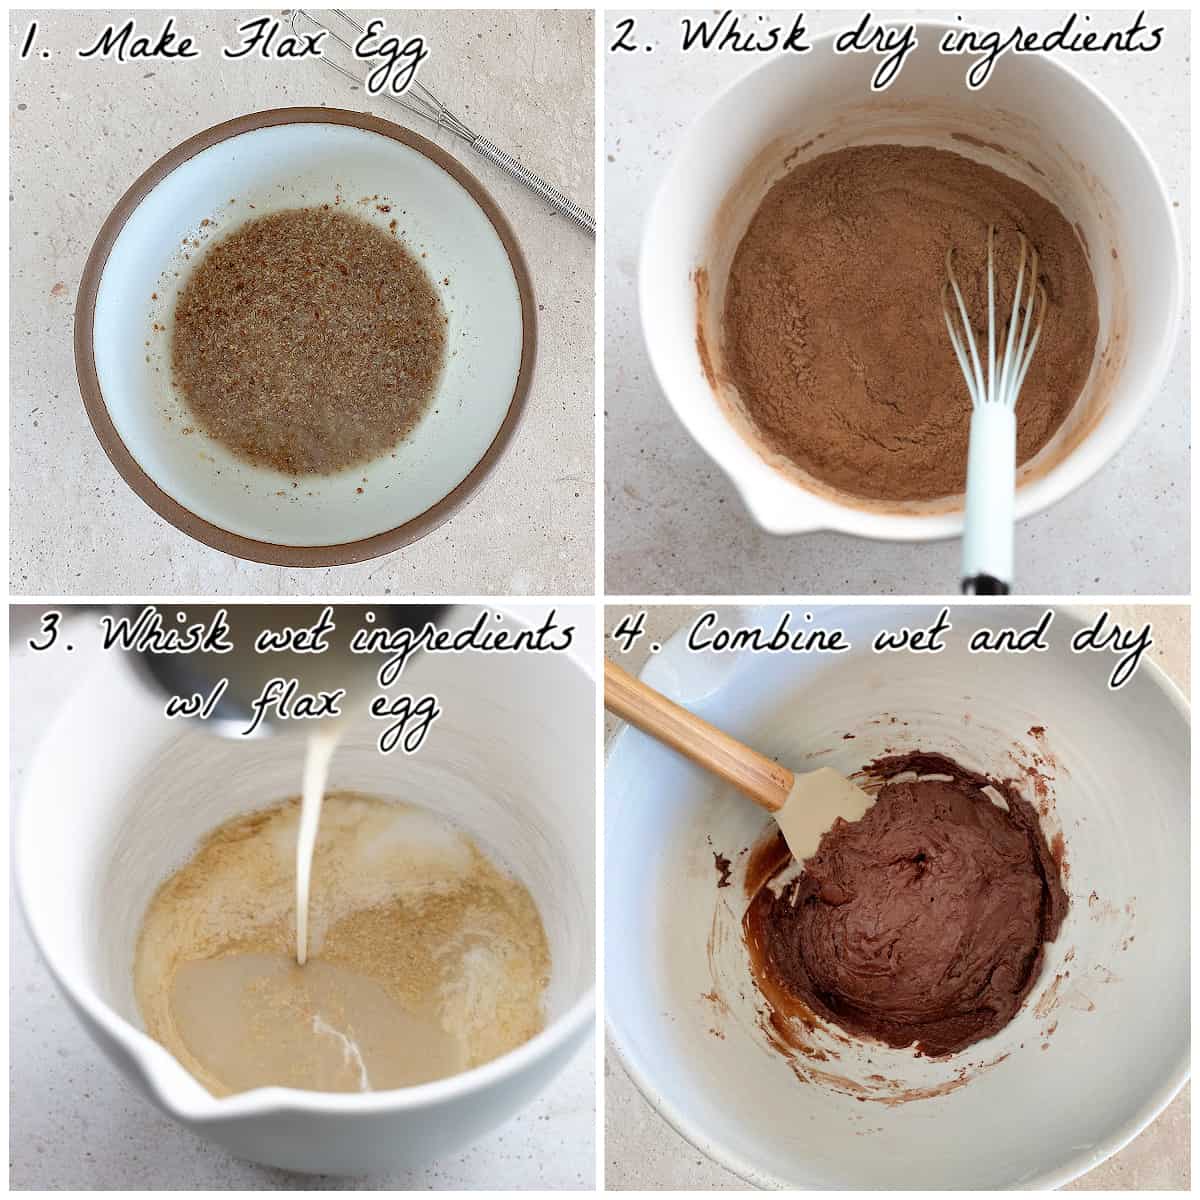
- Combine flaxseed meal and water in a small bowl and set aside for 10 min.
- Whisk all dry ingredients in a large bowl and set aside.
- In a medium bowl, whisk all wet ingredients together with the flax egg until combined.
- Pour the wet ingredients into the dry ingredients. Using a spatula, stir and fold until the dough is combined. Wrap the dough in cling wrap and place in the fridge for 2-3 hours.
- Preheat the oven to 350 °F (177 °C). Line a large baking sheet with parchment paper. Prep two small bowls for sugar coating - one with powdered sugar and one with cane sugar,
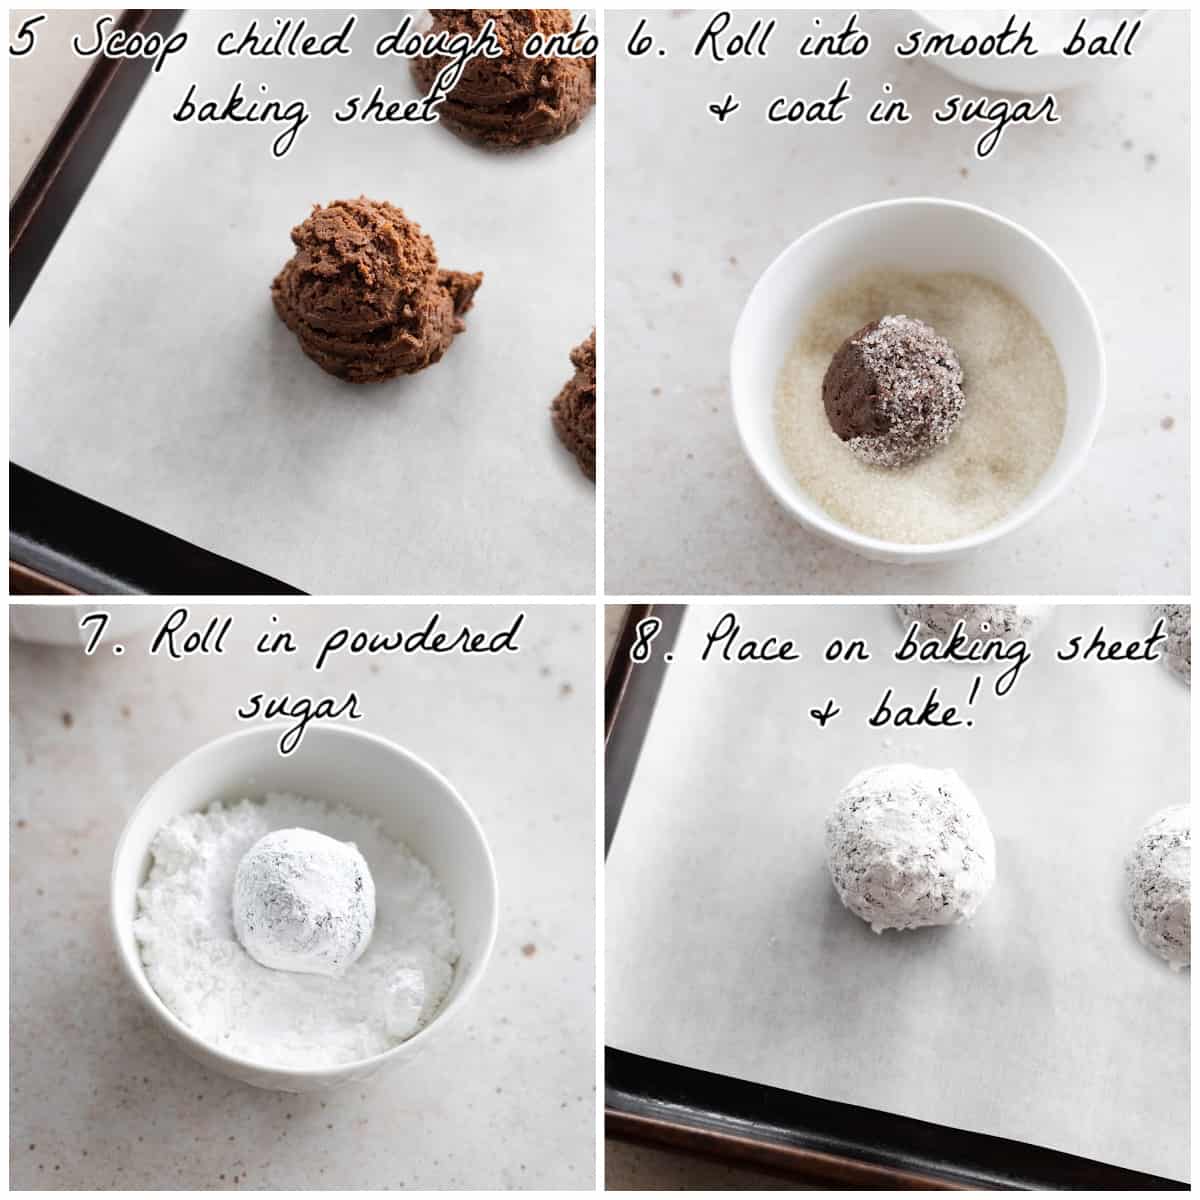
- Scoop out 1.5 tablespoons of dough and place it on the baking sheet. Continue until all the dough is scooped.
- Roll each piece of dough into a smooth ball, then dip it into the cane sugar to lightly coat all sides.
- Now dip into the powdered sugar to generously coat all sides.
- Place each piece back on the baking sheet about 2 inches apart. Bake in the oven for 11-12 minutes until they have spread, are crackled, and are slightly set around the edges. Let them sit on the baking sheet for 5-10 minutes, then place them on a cooling rack for at least 10 more minutes.
Tips for making the best Crinkle Cookies
- For uniform cookies, use a #50 cookie scoop that holds 1.5 tablespoons of dough. You can still bake beautiful cookies without a scoop, just try to make the dough balls the same size using 1.5 tablespoons of batter.
- Don't overmix the cookie batter. You want it to be fully combined, but stop right when that happens to avoid a tough and overly chewy consistency.
- Do not use cooking spray on the baking pans, or the cookies can overspread. Instead, use parchment paper or a silicone baking mat to prevent the cookies from sticking.
- Be careful not to overbake, or the cookies will become dry. Take them out when they have puffed up, have deep crackles, and the sides are slightly set. They will continue to cook on the baking sheet when you take them out of the oven.
- It's best to use room-temperature ingredients for this recipe. Warm ingredients will bond together much more easily and yield a smooth batter, and help maintain the proper structure while baking. Once the butter is melted, let it cool for a few minutes before using it.
- If you chill the dough for more than 3 hours, it's best to let it sit on the counter for 15-20 minutes to soften a bit.
Storing Tips
- Room Temperature - let the cookies completely cool before placing them in an airtight container. Line the bottom with paper towels to absorb any moisture. Store in a cool, dry place for 2-3 days.
- Fridge - store the cookies in the refrigerator in an airtight container lined with a paper towel for up to 5 days. I feel the cookies get a bit drier when stored this way.
- Freezer - after baking, let them cool completely, then freeze them in one layer on a cookie sheet that will fit in your freezer. When frozen, place them in an airtight container or freezer bag with wax paper in between the layers and store them for 2-3 months. To thaw, let them sit at room temp for 10-15 minutes. I don't recommend microwaving them or the powdered sugar will melt.
How to freeze the dough for later use
If you want to save your dough for later use, you can store it in the freezer for 2-3 months. Here's the easiest way to do it:
- Make the recipe as instructed and roll the dough into balls but skip the cane sugar and powdered sugar step.
- Place the dough balls on a non-stick baking sheet that will fit in your freezer (you may need 2 trays). Make sure the dough balls are not touching.
- Freeze until the dough is hard, about 2-3 hours.
- Now transfer the frozen dough balls to a freezer bag or container.
- When you're ready to bake, thaw the dough balls at room temp on a plate/tray, making sure they aren't touching each other. Thaw for 30 minutes, then roll the dough in the two sugars as per recipe instructions, then bake as instructed.
Recipe FAQs
For this recipe, you will need to chill the dough for at least 2 hours. This will prevent them from overspreading and flattening. This will also avoid misshapen cookies.
Yes, if you're in a pinch, you can freeze the cookie dough for about 20 minutes. Make sure to keep an eye on the dough so it doesn't start to freeze.

More holiday treats to enjoy
Did you make this recipe? Let me know what you think by leaving a star ⭐️⭐️⭐️⭐️⭐️ rating and sharing your feedback in the comment section below. It would make my day!
⭐️ Subscribe to the Vegan Huggs Newsletter and receive weekly recipes straight to your inbox! You'll also receive my FREE eCookbook featuring my top 10 recipes.
Recipe

Vegan Chocolate Crinkle Cookies
Ingredients
Wet Ingredients
- 1 tablespoon flaxseed meal (*see note #1)
- 2.5 tablespoons water
- ¾ cup (150g) cane sugar
- ⅓ cup (76g) vegan butter , melted & slightly cooled (*see note #2)
- 3 tablespoons (45 ml) non-dairy milk
- 2 teaspoons vanilla extract
Dry Ingredients
- 1 ¼ cups (157g) all-purpose flour (*see note #3)
- ½ cup (41g) cocoa powder , sifted
- 1 teaspoon baking powder
- ¼ teaspoon baking soda
- ¼ teaspoon sea salt
Sugar Coating
- 3 tablespoons (38g) cane sugar (*see note #4)
- ⅓ cup (40g) powdered sugar more if needed
Recommended Equipment
- 1 Extra Large Baking Sheet (or two standard ones - *see note #5)
- (1) 1.5 Tablespoon Cookie Scoop #50 (*optional)
- 1 Whisk
- 2 Mixing Bowls
- 3 Small Bowls
- Parchment Paper
Instructions
- Combine flaxseed meal and water in a small bowl to create a flax egg. Set aside for 10-12 min, stirring at the midway mark, and maybe once more to help the flax absorb the water. It should be thick, somewhat gel-like, and not watery.
- Whisk all dry ingredients in a large bowl and set aside (flour, cocoa powder, baking powder, baking soda, salt).
- In a medium bowl whisk together the wet ingredients with the flax egg until combined (melted butter, sugar, milk, and vanilla)
- Pour the wet ingredients into the bowl of dry ingredients (scrape everything out). Using a spatula, stir and fold until the dough is combined, making sure to scrape any dry powder at the bottom of the bowl (the dough will look like a very thick, sticky batter at first-this is normal. It will firm up as it chills). Wrap the dough in cling wrap and place in the fridge for 3 hours. Chilling will make it easy to handle and yield evenly-shaped cookies.
- Preheat the oven to 350 °F (177 °C). Take the dough out and let it rest at room temp for 10 minutes (not near the oven). Line an extra-large baking sheet with parchment paper (or two standard-sized sheets). Prep two small bowls for sugar coating - one with powdered sugar and one with cane sugar,
- Scoop out 1.5 tablespoons of dough and place it on the baking sheet. Continue until all the dough is scooped (A medium-sized cookie scoop #50 works well for this).
- Now, using your hands, roll each piece of dough into a smooth ball (if dough is sticking, lightly spray your hands with cooking oil). Now, dip the ball into the cane sugar to lightly coat all sides, then immediately dip it into the powdered sugar to generously coat all sides. Place each piece back on the baking sheet about 2 inches apart. Continue until all of the pieces are coated.
- Place in the oven for 10-12 minutes until they have spread, are crackled, and are slightly set around the edges. They will look undercooked, but that's normal, and they will continue to cook on the baking sheet out of the oven (don't leave them in the oven too long). Let them sit on the baking sheet for 5-10 minutes, then place them on a cooling rack for at least 10 more minutes. Enjoy!
Notes
- Flaxseed Meal - If using whole flaxseeds, grind them first (using a coffee grinder) and measure after grinding. No flax? Substitute ½ cup (120g) of applesauce and omit the water and the non-dairy milk. Whisk the applesauce with the melted butter, sugar, and vanilla, then follow the recipe as written. The cookies will be slightly puffier with different cracks but still delicious!
- Vegan Butter - I used Miyoko's, but any non-dairy butter works. You can use unsalted, but I felt the taste was better with the salted variety. If using unsalted, add ¼ teaspoon salt. You can also use a neutral oil, using the same method, but expect a slightly fudgier, thinner cookie. The powdered sugar seems to fade faster with oil, so it's best served within 6-8 hours.
- All-Purpose Flour - For best results, I recommend weighing your ingredients. If you're using measuring cups, the next best method is 'spoon and level': first give the flour a quick stir in the container, then spoon it into the measuring cup without packing or tapping, and lightly sweep off the excess with a knife. Avoid scooping directly from the container, as this can add too much flour and affect the final texture. Measure all other ingredients as accurately as possible using proper measuring cups and spoons.
- Granulated Sugar Coating - Don't skip this! It helps create defined cracks and slows the powdered sugar from fading. Be generous with the powdered sugar for that stark white crinkle look.
- Baking Sheet - If using two standard baking sheets instead of one extra-large, bake one batch at a time. If you only have one standard sheet, keep half the dough in the fridge while the first batch bakes, then let the pan cool completely before reusing.
- See the post above for extra tips, FAQs, and step-by-step photos.


Dante
These cookies are amazing! They have become a weekly staple in my house, thank you for a great recipe 🙂
I had a thoght ... would it be possible to adapt these to make coffee crinkle cookies and matcha crinkle cookies? I've tried other vegan recipes available but they didn't turn out as lovely as your chocolate crinkle cookies
Melissa Huggins
Hi Dante, I'm so glad these are a weekly staple in your home. Thank you for sharing feedback. 🙂
I love your matcha and coffee crinkle cookie ideas! They both could work, but I'm not sure of the adjustments needed. The matcha would need a bigger adjustment, though. I may have to test this out soon. They sound delish! 🙂
Dante
Super excited to hopefully see more crinkle cookies recipes on your page [nudge, nudge]! 🙂
Melissa Huggins
Noted! Thank you for the feedback and suggestion. 🙂
Aubade
These were so delicious!! I always wanted to try crinkle cookies. I’d never had them before. I was worried they’d come out bad because I’m not a very good baker but they were amazing!! So fudgy and delicious. Thank you so much for this awesome recipe. It is going into my regular Christmas rotation!!
Melissa Huggins
Yay, I'm so glad they were a hit for you. Thank you for making them and sharing feedback. Have a Merry Christmas! 🙂
Rob
These turned out more light and cake-y than I expected, probably because I added extra flour. When measuring the flour, I sifted it through a strainer directly into the measuring cup. After mixing, the dough was still very wet, like cake batter. I added flour a tablespoon at a time until the dough was firmer...about the consistency of play dough. Refrigerated for 3 hours. Flavor was a little bland, again, likely because of the extra flour. I used a 1.5T scoop and got 21 cookies. I think I will try this again, but omit the milk and see if that results in an initially stiffer dough, or possibly substitute oil for butter.
Melissa Huggins
Thanks for the feedback! The cake-y texture likely stemmed from the flour measurement: sifting it directly into the measuring cup aerates it a lot, so you ended up with less flour by weight than intended, which made the dough wetter initially. Then adding extra flour to firm it up overcompensated, shifting it to cakey and diluting the flavor. The dough starts very thick and sticky, but it will also not be firm enough to handle (it needs to be chilled first). Next time, try just a gentle stir in the container to aerate the flour, then spoon and level—no extra flour needed! If you have a scale, you can use the metric measurements, which are the most accurate. I hope you'll try them again. 🙂
Christine
Hello from the UK! Oh my goodness, I just made these this afternoon and they are gorgeous!! They looked exactly as the recipe picture too. These are now on my Favourite recipe list and I shall definitely be making them again. It would be great if they were freezable, but I doubt they are owing to the beautiful white finish which I suspect would disappear once ice crystals got to them.
Melissa Huggins
Hi Christine, this made my day! I'm so happy you loved the cookies. Thank you for trying them and sharing your feedback.
I have frozen them with success and the powdered sugar did stay intact. I was happily surprised! Here's how to do it: After baking, let them cool completely then freeze them in one layer on a cookie sheet that will fit in your freezer. When frozen, place them in an airtight container with wax paper in between the layers and store them for 2-3 months. To thaw, let them sit at room temp for 10-15 minutes. I don't recommend microwaving them or the powdered sugar will melt.
Christine
Hi Melissa, that freezing tip worked perfectly, thanks so much!
Melissa Huggins
You're most welcome, Christine! 🙂
shannon
Really chocolatey and tasty cookies! Thanks.
Melissa Huggins
You are welcome!Happy holidays. 🙂
kathleen zingone
Delicious, fudgy cookies! Easy to follow directions!
A great recipe!
Melissa Huggins
I'm so glad you love them, Kathleen! Thank you for trying them and sharing your lovely feedback 🙂
Maggie
Yummy! My kids favorite. So happy they ate Vegan! Thank you!
Melissa Huggins
Yey! Thanks for trying it, Maggie! Happy holidays.🙂