This post contains affiliate links. Read my disclosure policy here.
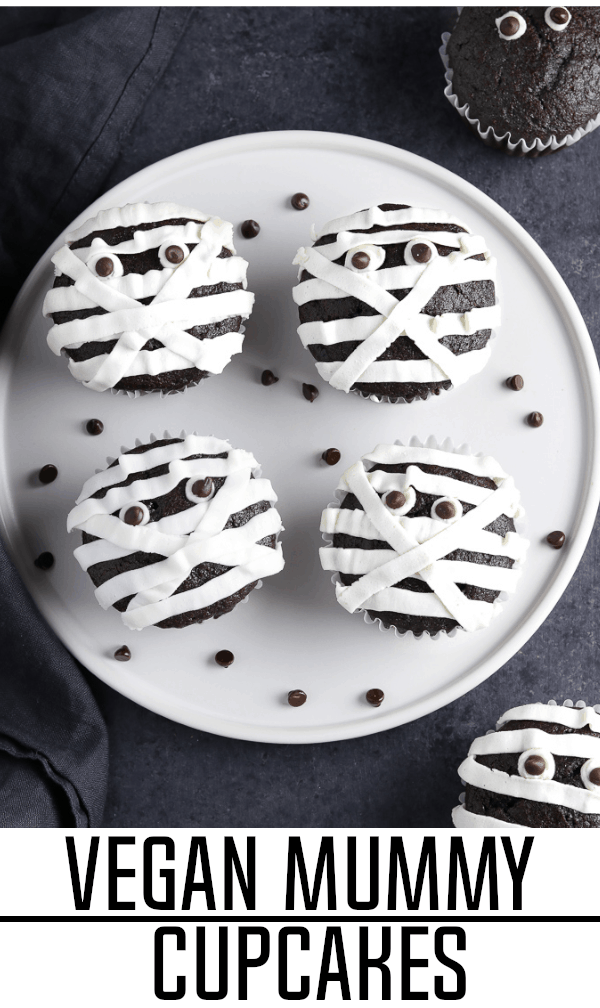
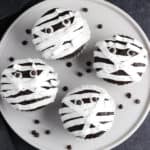
These Vegan Mummy Cupcakes will be a hit at your spooky Halloween bash. They are fun to make, kid-friendly and completely adorable! The mummy wrapping is piped on with vegan buttercream and the eyes are dotted with chocolate chips. It's so easy!

It's getting close to that ghoulish time of year again and that means silly costumes, fun parties, and spooky treats! Let the fun begin! We have a party every year and the kiddos love these Mummy Cupcakes. The big kids go crazy for them too! Who wouldn't?
These cupcakes have a rich chocolate flavor with a tender crumb, and the mummy face is frosted with silky vegan buttercream. They are delicious!
Plus, they are really easy to make and you can get the kids involved. The piping doesn't have to be perfect and any imperfections will only add to the mummy's character. It's a fun way to spend time with your kids and teach them how to bake.
Here's how to make them
(FULL PRINTABLE INSTRUCTIONS IN RECIPE CARD BELOW)


- Add the soy milk and apple cider vinegar to a medium bowl and whisk to combine. Let it sit for 10 minutes to create vegan buttermilk.
- Place a mesh strainer on top of a large bowl and sift together the flour, cocoa powder, baking soda, and salt.
- Whisk to combine well and set aside.
- In the medium bowl with the buttermilk, whisk in the oil, applesauce, sugar, and vanilla.
- Slowly pour the wet ingredients into the dry ingredients.
- Whisk together until just combined. Small lumps are fine.
- Divide batter evenly into each slot about ⅔ full and bake them in the oven for 20-24 minutes.
- To check for doneness, lightly press the surface. It should spring back easily. Let the cupcakes cool in the pan for 10 minutes before removing. Then let them cool on a rack for at least 30 minutes before frosting.
Baking Tips
- Don't overfill the cupcake liners with batter or they won't rise properly and the tops will flatten. ⅔ full should be the max. If you have extra batter, just fill a few liners in another pan.
- Don't overmix the batter or you may end up with a dense, flat, and chewy cupcake. Whisk until it all just comes together and you don't see dry ingredients. A few small lumps are ok.
- For accurate results, don't scoop the flour with a measuring cup directly from the flour container. Instead, scoop the flour out of your container with a spoon and then into a measuring cup. Don't pack or tap the cup. After filling, lightly sweep a butter knife across the top to remove the excess flour. * Example photo below the recipe card.
- Make sure your baking soda is not expired. Fresh baking agents are important for a successful baking experience

Items needed to decorate Mummy Cupcakes
- Frosting Tip #44
- Piping Bag or Large Ziploc Bag
- 12-Slot Cupcake Pan
- Cupcake Liners
- Small Ziploc
- ½ Batch Homemade Buttercream Frosting (or 1 cup store-bought)
- 12 Vegan Chocolate Chips
How to decorate
To make the mummy eyes, place 1 heaping tablespoon of frosting into a small Ziploc bag and push it down to one corner. Twist shut and cut a very small piece off the corner. Make two rounded dots on each cupcake by pressing gently on the bag. Place a chocolate chip in the middle of each dot and gently press down a little.
To make the mummy wrapping, fit a Pastry Bag or Large Ziploc Bag with a #44 Basketweave Frosting Tip (#45 will work too, but the strips will be wider). Make about 5-6 strips going across the face. Pipe a strip diagonal across cupcake (from temple to jaw). Now repeat the same strip on the opposite side. Feel free to add more strips for a layered effect. Have fun with it!
Decorating Tips
If you're using my homemade buttercream (highly recommend) it will soften quickly in the piping bag with warm hands. So, if you don't feel you can pipe the mummy strips fairly quickly, it's best to add the frosting to the piping bag in small batches and leave the rest in the bowl. Just add more as needed. It also helps to keep frozen veggies or an ice pack nearby to keep your hands cool in between piping.

How to store decorated cupcakes
The buttercream frosting can stay out at room temperature for hours without softening too much. However, I prefer to store the decorated mummy cupcakes in the fridge in an airtight container. I usually take them out an hour before serving. This keeps them fresh, sets the buttercream and prevents it from getting too soft.
Can I make them gluten-free?
I haven't tried making these gluten-free yet, but I think a 1.1 gluten-free all-purpose flour should work well. Let me know if you give it a try.
Can I use store-bought frosting?
Absolutely! If you don't have time to make the buttercream, you can use a vegan store-bought variety. If it's too thick, you may need to whip in a few splashes of non-dairy milk or whip in powdered sugar if it's too thin. Store-bought frosting whips up really well and turns out really fluffy.
Do I need a piping bag and frosting tips?
You can use a large Ziploc bag instead of a piping bag, but you do need a basketweave frosting tip (#44 or #45) to make perfect strips. If you've figured out how to do it without the frosting tip, let me know.
Can I use store-bought mummy eyes?
I haven't found any that were vegan, so I just make my own with the frosting and vegan chocolate chips. They are just as cute in my opinion and super easy!
Can I use any flavored cupcakes?
Yes! You can basically decorate any treat that has a big enough surface for the mummy face. I've made mummy cupcakes with my Vegan Vanilla Cupcakes and they were adorable! So, if you're not a chocolate fan, you may want to make them instead.

More Vegan Halloween Treats to Enjoy:
I love to hear from you
If you make these Mummy Cupcakes, let me know what you think by ★ star rating them and leaving a comment below. It would really make my day. You can also follow me on Instagram and share your creation with me. Just tag me @veganhuggs and hashtag #veganhuggs so I don't miss it.
Recipe
Mummy Cupcakes
Ingredients
Wet Ingredients
- 1 cup soy milk
- 1 tablespoon apple cider vinegar (sub lemon juice)
- 1 cup granulated sugar
- ⅓ cup grapeseed oil or any neutral-flavored oil
- ¼ cup applesauce
- 1 tablespoon vanilla extract
Dry Ingredients
- 1 ½ cups all-purpose flour (*see note about measuring)
- ½ cup dutch processed cocoa powder (sub unsweetened cocoa powder)
- 1 teaspoon baking soda
- ¾ teaspoon salt
To Decorate
- ½ batch Vegan Buttercream Frosting (sub 1 cup store-bought)
- 24 vegan chocolate chips
Recommended Equipment
- Basketweave Frosting Tip #44 (or #45)
- Piping Bag or Large Ziploc Bag
- Cupcake Liners
- Small Ziploc Bag
Instructions
Chocolate Cupcakes
- Preheat your oven to 350 °F (177 °C). Fill a 12-Slot Cupcake Pan with Cupcake Liners.
- In a medium Mixing Bowl, add the soy milk and apple cider vinegar. Combine and let it sit for 10 minutes to create a vegan buttermilk. It will thicken and curdle slightly. Set aside.
- In a large mixing bowl with a Mesh Strainer on top, sift together the flour, cocoa powder, baking soda, and salt. Now whisk to combine well. Set aside.
- In the medium bowl with the buttermilk, add the oil, applesauce, sugar, and vanilla. Whisk to combine well.
- Now slowly pour the wet ingredients into the larger bowl of dry ingredients. Whisk together until just combined. Small lumps are fine. (*Don't over mix or it can create a dense and chewy cupcake)
- Divide batter evenly into each slot about ⅔ full (an ice cream scoop works great for this). Bake them in the oven for 20-24 minutes. To check for doneness, lightly press the surface - It should spring back (You can also use a toothpick and push it through the center - it should come out clean).
- Let the cupcakes cool in the pan for 10 minutes before removing. Then let them cool on a rack for at least 30 minutes before frosting.
Buttercream Frosting
- Add the softened vegan butter to the bowl of a Stand Mixer (or use a Medium/Large Stainless Steel Bowl with a Hand Mixer). Beat until fluffy for 30-60 seconds.
- Add the vanilla extract and mix until incorporated (about 30-60 seconds)
- Now add the powdered sugar, ½ cup at a time over low speed until it's fully incorporated. Scrape down sides as needed. Now turn up to medium-high speed and mix until smooth and fluffy. Taste and add more sugar if needed. (*if the buttercream is too stiff, add a few teaspoons of non-dairy milk and mix until fully incorporated).
To Decorate
- For the mummy eyes, place 1 heaping tablespoon of frosting into a small Ziploc bag and push it down to one corner. Twist shut and cut a very small piece off the corner. Make two rounded dots on each cupcake by pressing gently on the bag. Place a chocolate chip in the middle of each dot and gently press down a little.
- For the mummy wrapping, fit a Pastry Bag or Large Ziploc Bag with a #44 Basketweave Frosting Tip (#45 will work too, but the strips will be wider). Make about 5-6 strips going across the face. Pipe a strip diagonal across cupcake (from temple to jaw). Now repeat the same strip on the opposite side. Feel free to add more strips for a layered effect. Have fun with it!
Notes
Nutrition


Stephanie
These are my go-to cupcakes whenever I need vegan cupcakes. They are moist, super chocolatey and absolutely delicious. For the buttercream frosting I found Earth balance butter works really well and tastes delicious! Happy baking!
Support @ Vegan Huggs
Hi Stephanie! We are so happy that you love the recipe! Thank you so much for sharing! 🙂
Ginny McMeans
Wow! This is a wonderful recipe! I've been wanting to make more with these flours and what a perfect excuse. So adorable too!
mhuggs
Thank you, Ginny!This combo seems to work in a lot of recipes. No big fails yet 🙂
Mel | avirtualvegan.com
They are so adorable!!! Children will love them this Halloween!
mhuggs
Thank you, Melanie! 🙂
Mary Ellen @ VNutrition
These are so cute Melissa! Everyone will love these for Halloween! Love how you melted the chocolate chips into the coconut oil to make them chocolate-y!
Sarah
ADOREable!!!!
mhuggs
Thank you, Sarah! 🙂
dianne
These are so cute! They make me wish I was going to a Halloween party this year.
mhuggs
Thank you, Dianne! I wish I was going to a party, too 🙂
Jenn
Oh my gosh, these are so cute! I totally love this idea - my kids wold think I was so awesome if I made these! These are for sure going on my list of yummy treats to bake very soon!
mhuggs
Thank you, Jenn! I'm not much of a cake decorator, but these were pretty easy. 🙂
Anna
Oh Melissa!!! How great looking are these?!? I'm not much of a cake decorator myself, but you have inspired me to create these babies! I think your little fire fighter will win the hearts of the whole school with these cupcakes!!! xxx
mhuggs
Thank you, Anna! He's going to be so excited 🙂
Amy Katz from Veggies Save The Day
These mummy cupcakes are so incredibly cute! I love how you made them gluten free and used healthy ingredients.
mhuggs
Thank you, Amy! I hope the kids love them 🙂